How to Size Down Layers Outside of Art Area Illustrator Cc
One of the well-nigh often asked questions from Illustrator users is "How can I crop an image?". Adobe introduced Epitome Ingather function in CC2017 which makes information technology available to any users on Adobe's Creative Cloud. For those wanting additional control and precision, Astute Graphics too offers the Rasterino plugin as part of the subscription.
This tutorial will encompass both cropping, trimming, cover the differences between clipping mask-based cropping and truthful cropping, plus how to handle embedded and linked images.
Basics using the native Mask and Crop Image methods
Drag-and-drop an epitome into an Illustrator artboard, or employ File > Identify...
If the prototype is linked, it volition appear with a cross annotation over the entire paradigm. If embedded, the cross annotation will not announced. See the post-obit sections about the differences between linked and embedded images.
To easily apply a vector mask, or truly crop and image, you volition demand either the Control Panel (Window > Command, not shown past default in more than recent Creative Cloud updates) as highlighted in red below, or the more recently-introduced Properties Panel (Window > Backdrop) equally highlighted in green.
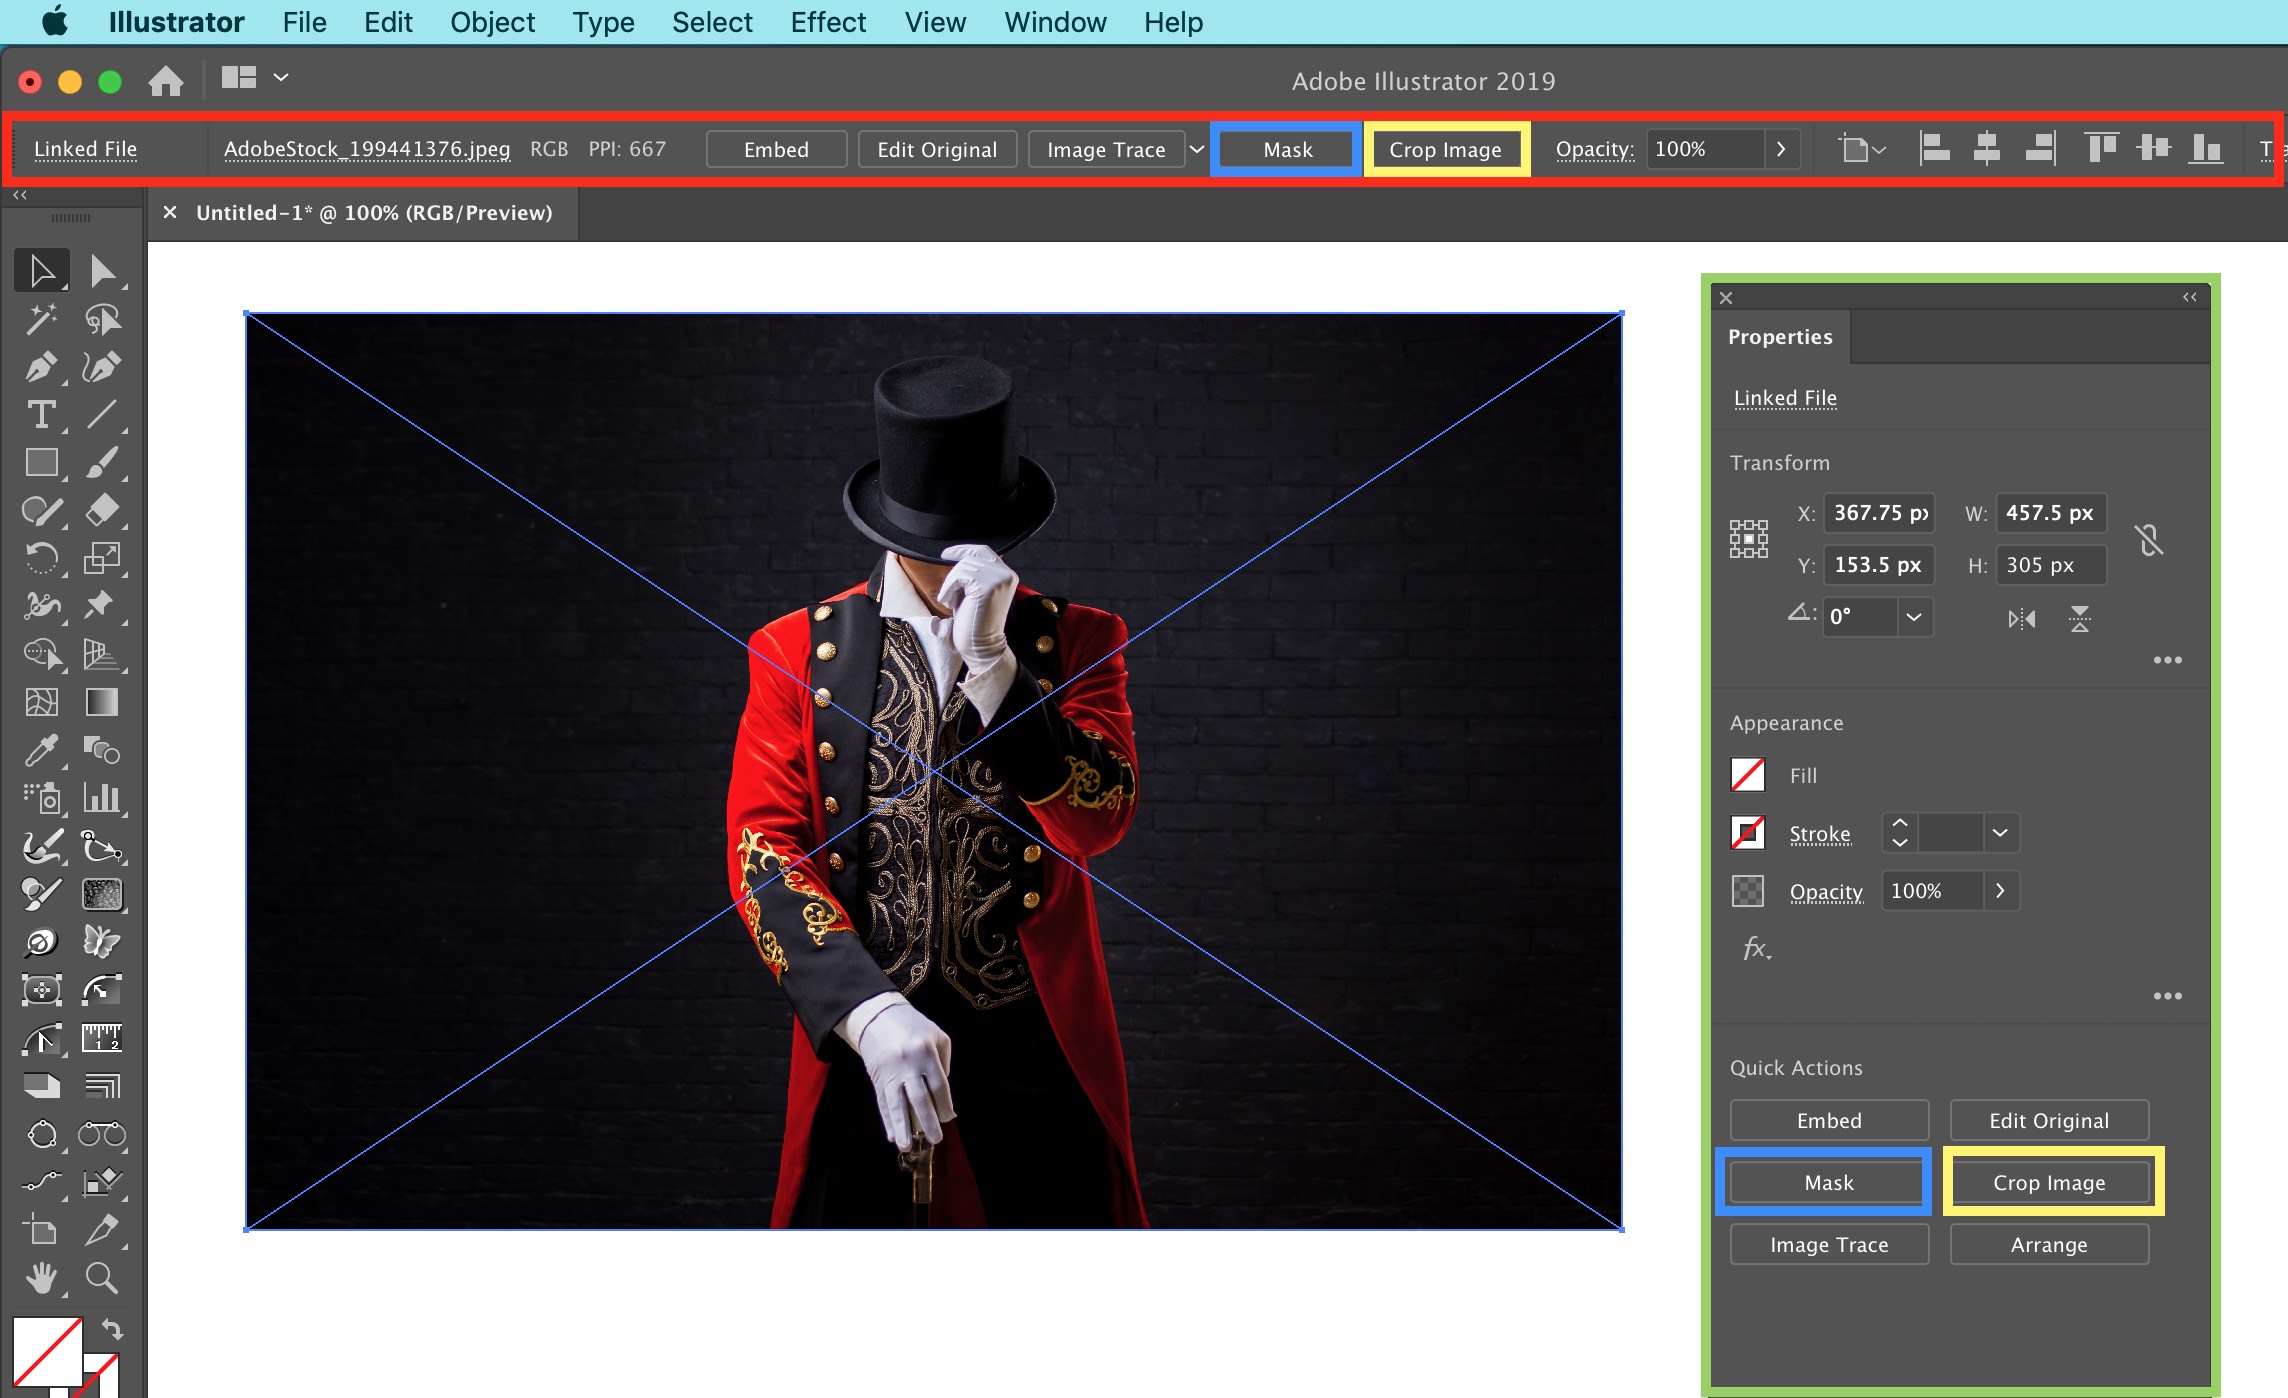
Both of these panels are context sensitive. Therefore, their contents change dependant on what blazon of object(due south) is selected. This screenshot was taken with but a unmarried placed paradigm selected. The Properties Panel has as well evolved with subsequent iterations of the Creative Cloud; therefore, depending on the version of the Illustrator CC you are running, you may see differences.
In both the Control and Backdrop Panels, Mask and Ingather Epitome buttons are presented.
Apply Mask

With the single placed or embedded epitome still selected, click on the Mask button in the Control or Properties console.
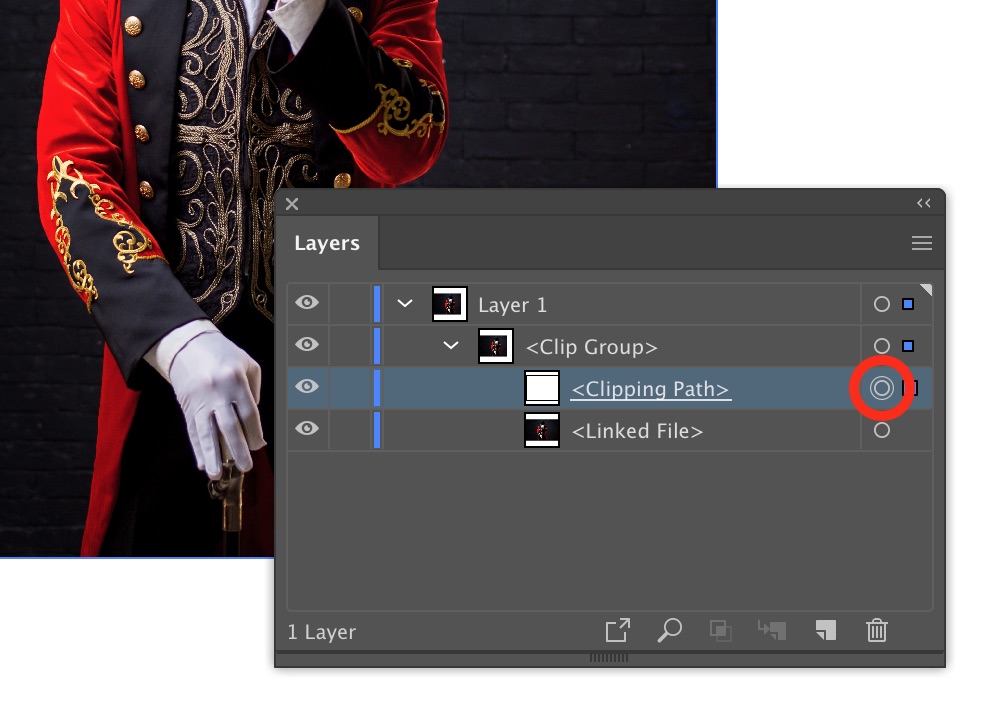
Elevate any of the mid-edge or corner handles that are placed effectually the image to change the size of the vector mask. Continue to edit the handles until you're happy with the result.
Every bit soon every bit you offset to do some other operation in Illustrator, all automated vector mask editing is stock-still.
You tin later edit or arrange the vector rectangular mask past targeting the automatically created <Clipping Path> associated with the image in the <Clip Grouping> found in the Layers Panel. To target (select) the clipping path, click on the "meatball" icon as highlighted hither below.
Ingather Paradigm
With the single placed or embedded paradigm notwithstanding selected, click on the Ingather Prototype button in the Command or Backdrop Panel.
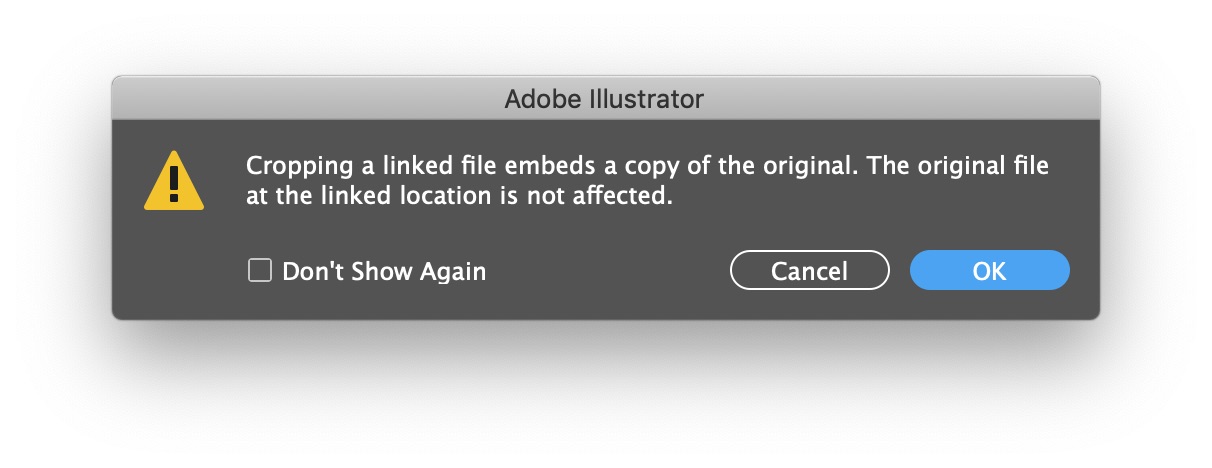
Note: if the image was linked rather than embedded, the warning dialogue will exist presented stating "Cropping a linked file embeds a re-create of the original. The original file at the linked location is not afflicted.". This is a welcome feature to automatically perform this logical operation.
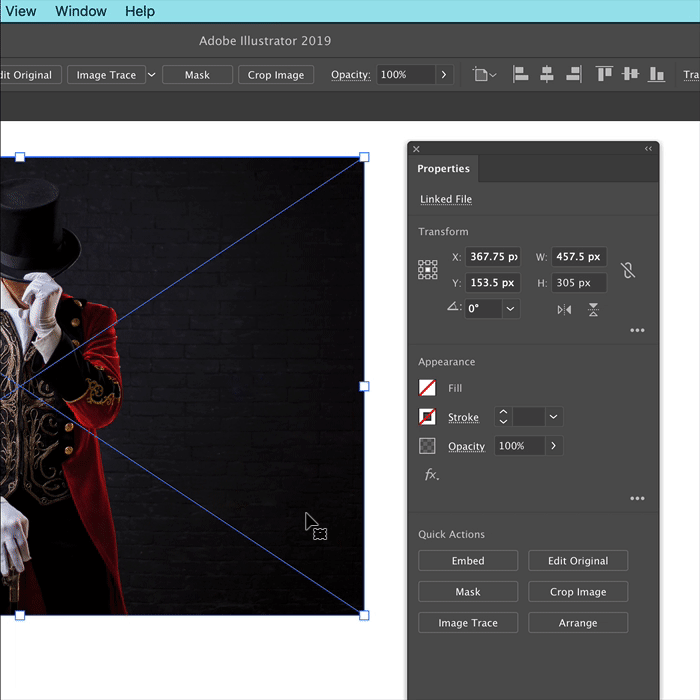
Dissimilar with the Mask button, a much clearer alter of annotation surrounding the image is presented. The Control and Properties Panels both also temporarily change whilst the crop is taking place.
Click-and-drag any of the mid-edge or corner paradigm handles. Holding downwards Alt volition also ensure that any changes are mirrored on the reverse side or corner.
Numerical controls are also presented in the Command and Backdrop Panels to precisely land the epitome dimensions.
Information technology's as well possible to simultaneously re-sample the image to a dissimilar resolution from current using the PPI value presented in the Properties Panel.
When happy with the ingather, click on the Apply button in the Control and Properties Panels.
The resultant epitome at present has the excess epitome information removed. Note that unless you Undo the performance now, without resorting to re-placing the prototype in the document, at that place's no manner to revert dorsum to the original united nations-cropped prototype.
Cropping prototype tool alternative
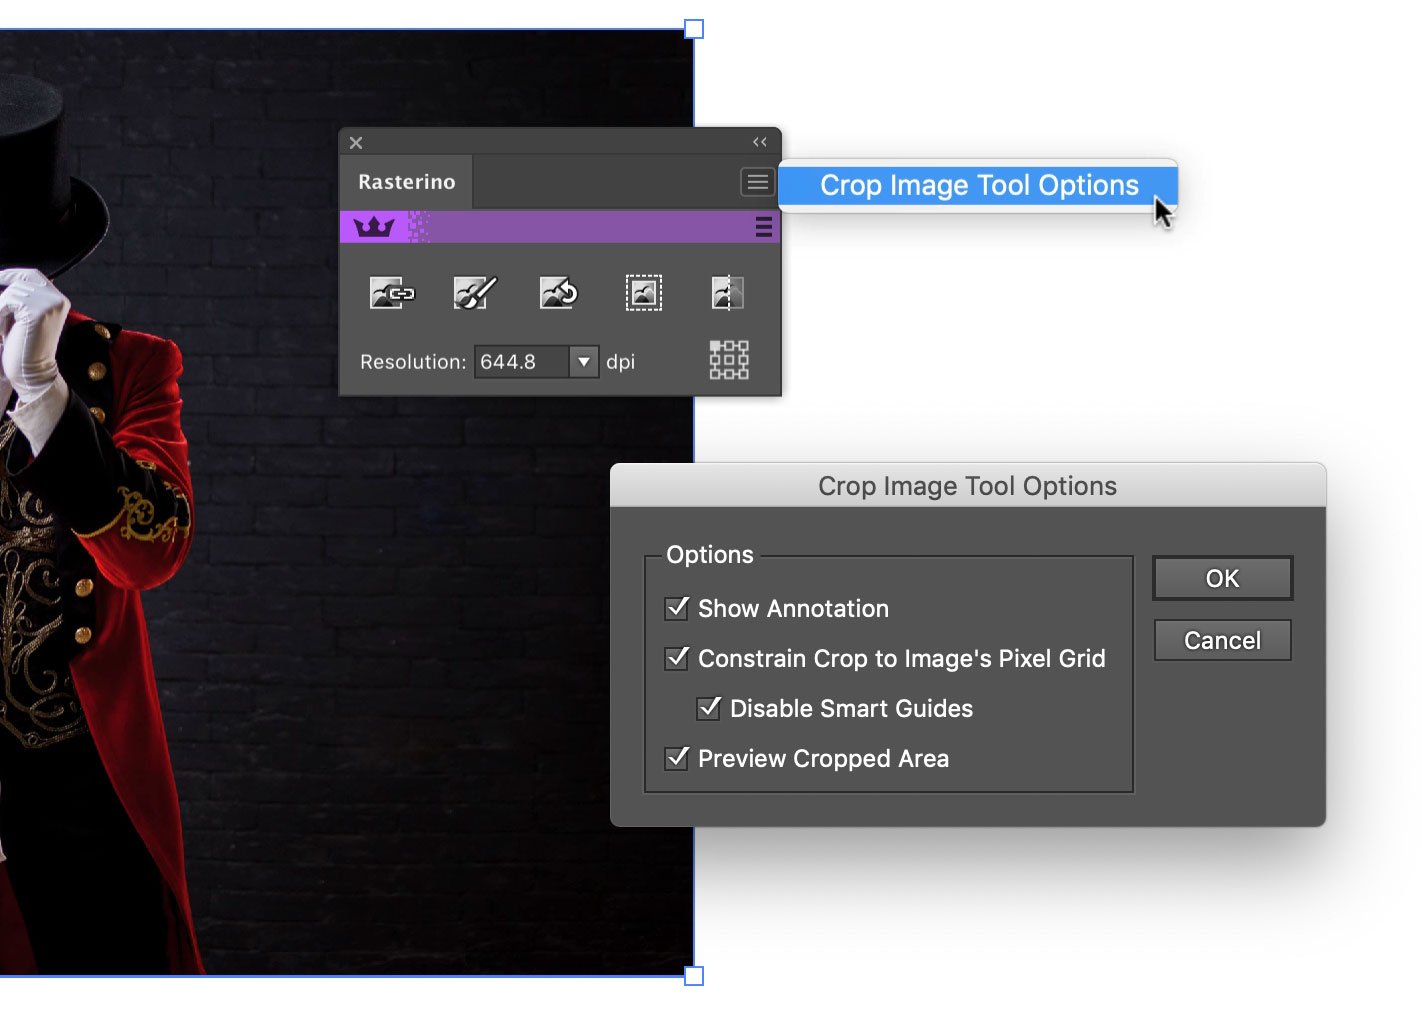
Several years before Adobe got effectually to adding true image cropping to Adobe Illustrator, Astute Graphics introduced the Rasterino plugin. This production, now office of our subscription, features the Crop Image Tool.
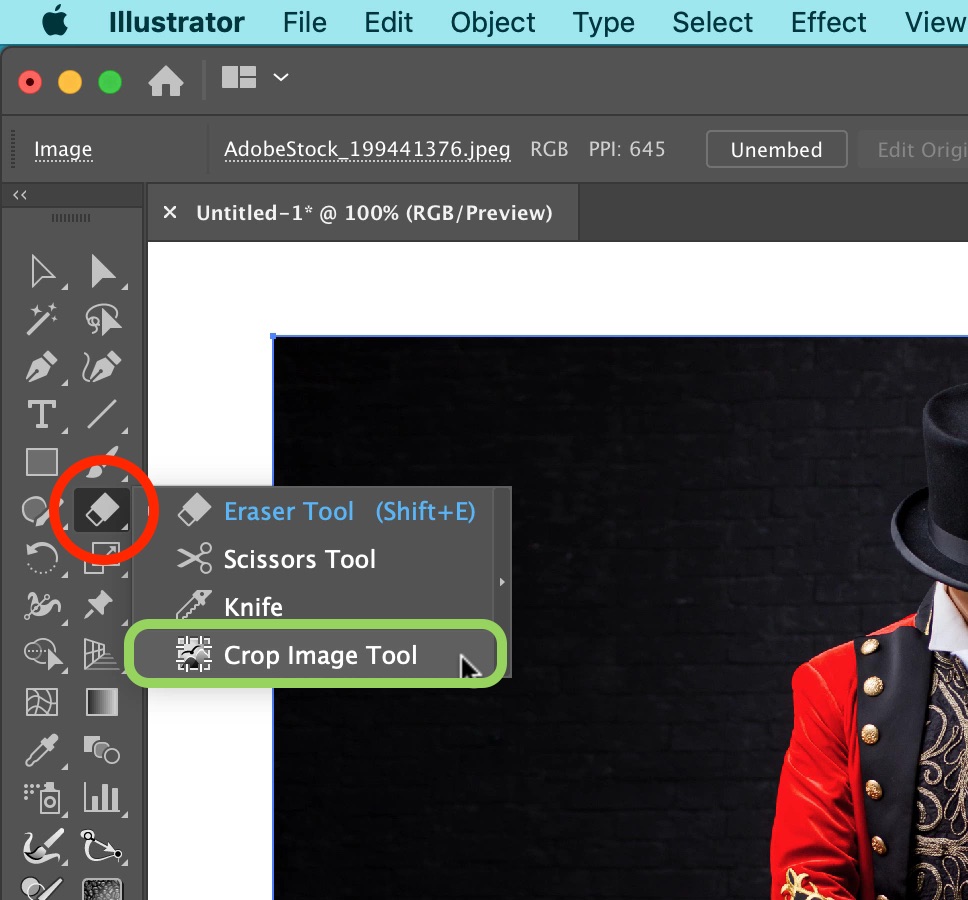
To locate information technology, if working with Illustrator CC2019 or later on, first ensure that you are working with the advanced toolbar (Window > Toolbars > Advanced).
Next, click-and-concur the Eraser Tool icon in the toolbox (highlighted reddish below) and release the mouse when hovering over the Crop Epitome Tool.
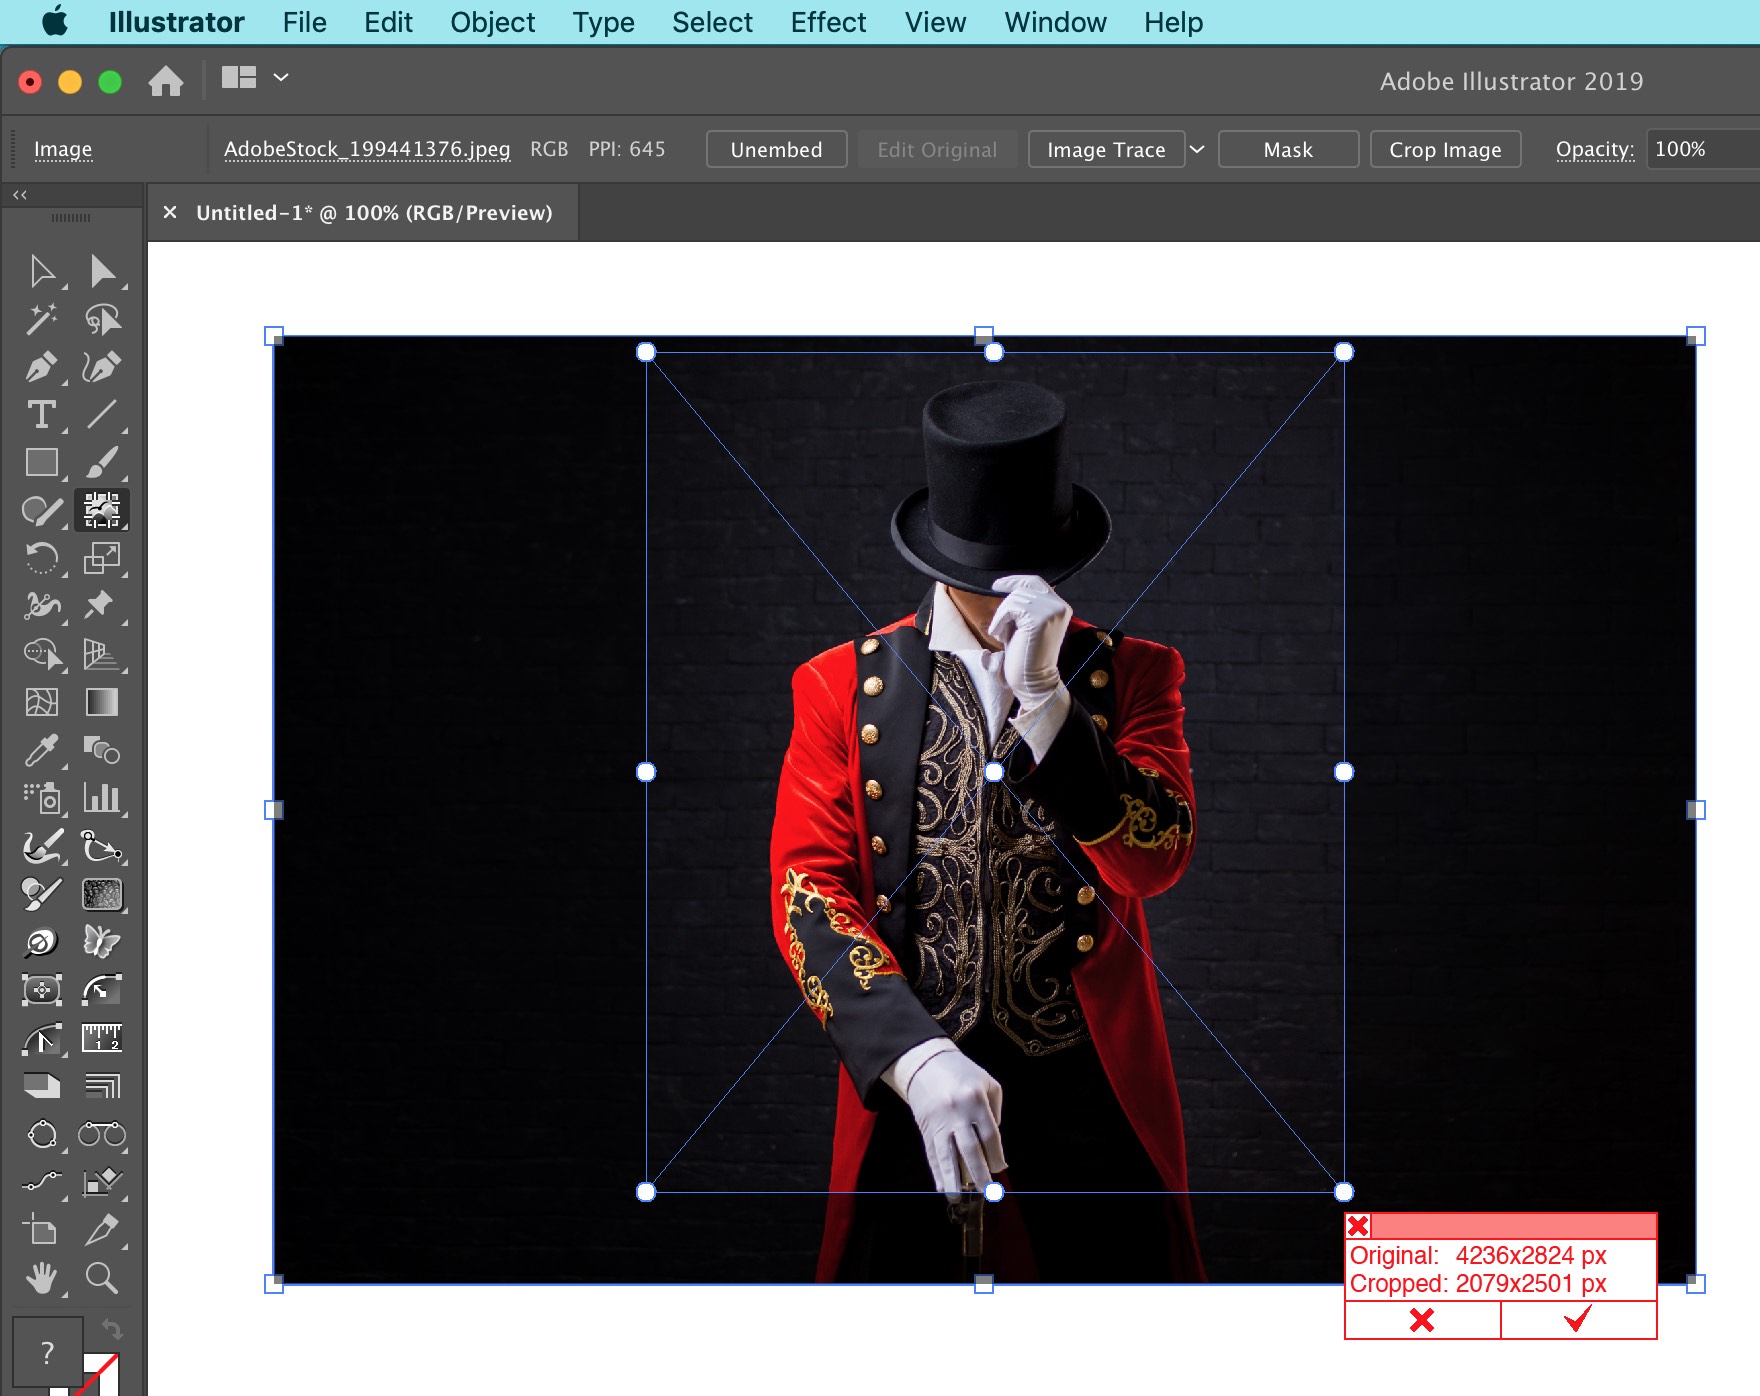
It is important an embedded image is selected. If the prototype is linked, first embed it using the appropriate button found in the Control or Backdrop Panels. If already in the Ingather Image Tool, simply use CMD (macOS) or Ctrl (Windows) to temporarily allow a selection to exist made.
A frame annotation will appear effectually the embedded image with command handles as well as a floating information annotation with a "tick" and "cross" icon to either use the desired ingather or abolish. The floating annotation also provides before and after pixel dimensions. Alternatively, use the Enter (Return) key to chop-chop apply a crop.
One key advantage of using the Rasterino Crop Paradigm Tool is that y'all tin assign a keypress to the Crop Image Tool (Edit > Keyboard Shortcuts...) allowing power users to chop-chop determine and utilise a true image crop.
Advanced paradigm cropping with precision
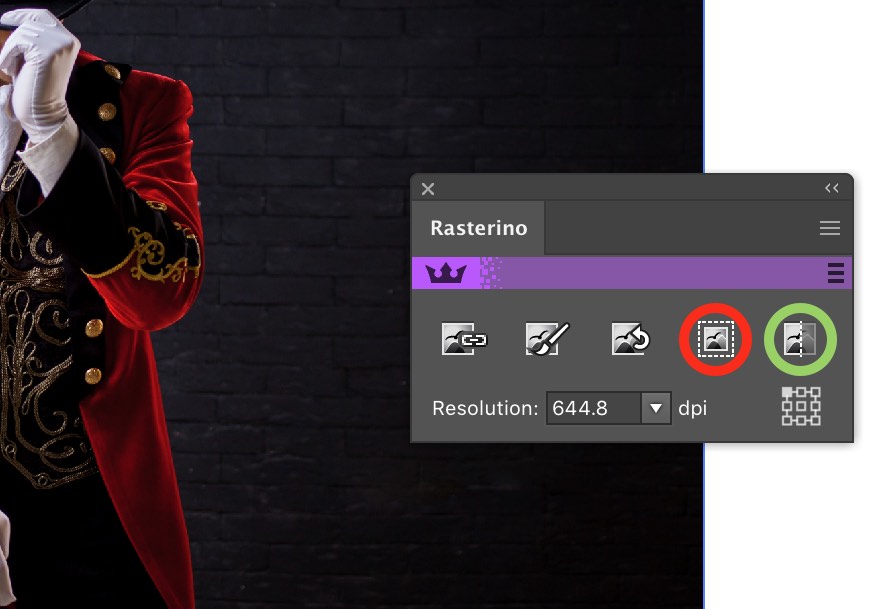
Whereas the native and Rasterino epitome cropping methods detailed to this indicate are adequate for quick visual tasks, it'south sometimes necessary to make a more than precise change or control multiple images simultaneously. This is available via the Rasterino Panel (Window > Rasterino > Rasterino Panel) which offers both a Trim Image (red highlight) and Crop Epitome (light-green highlight) control:
Trim Image
The case paradigm used throughout the article was edited in Photoshop so that a radial gradient transparency was introduced. When the image was embedded in Illustrator, the extremities of the image were redundant due to a lack of opacity.
The common situation of having a transparent image embedded in Illustrator with excessive transparency masking is an ideal state of affairs for using the Trim Image part via the Rasterino Console. This technique will be familiar to users who have used the Trim option in Photoshop (Image > Trim...).
With the semi-transparent image selected in Illustrator, the Trim Image icon in the Rasterino Panel was selected (highlighted in crimson) to open the Trim Image dialog. The defaults of Transparent Pixels and Preview remained selected (highlighted in green). Automatically, the image boundary note shows the suggested prototype crop that will accept identify (illustrated with the yellow arrows).
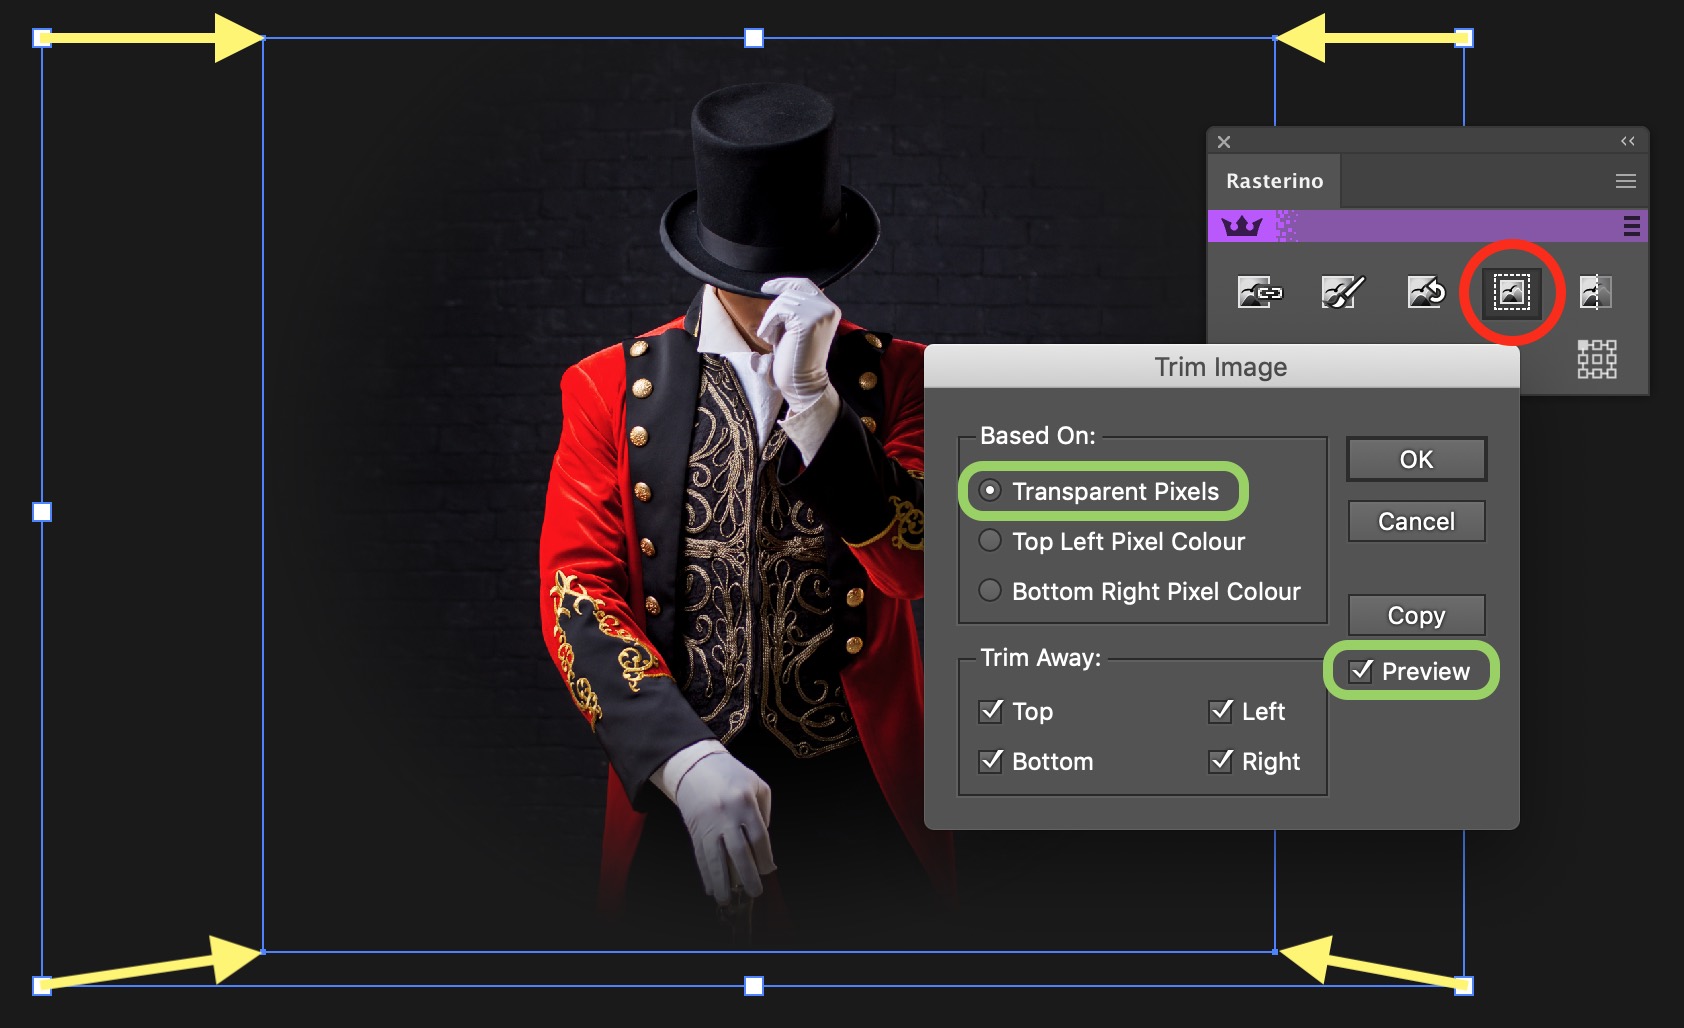
Click on OK to trim the image and crop away the excess transparency pixels, or Re-create to maintain the underlying paradigm and identify a trimmed copy exactly in position on summit. All visual guesswork to achieve this has been eliminated.
This Rasterino function likewise allows for the trimming of excess flat color areas based on the top left or bottom right pixels.
Pro tip - this function tin also be applied to multiple images simultaneously!
Crop Epitome (multiple images and numerically)
If you lot need to be very precise about the final image size, it'due south highly recommended yous use the Crop Image dialogue accessed via the Rasterino Panel.
With i or more than embedded images selected, even if different sizes, click on the Ingather Prototype icon to open the dialogue. From here, you can numerically adjust the image size with annotated previews on the artboard of the event. Critically, you lot can crop by stating how much you desire to reduce the image by, instead of absolute. Plus, piece of cake admission to the units of measurement used to determine the crop are presented.
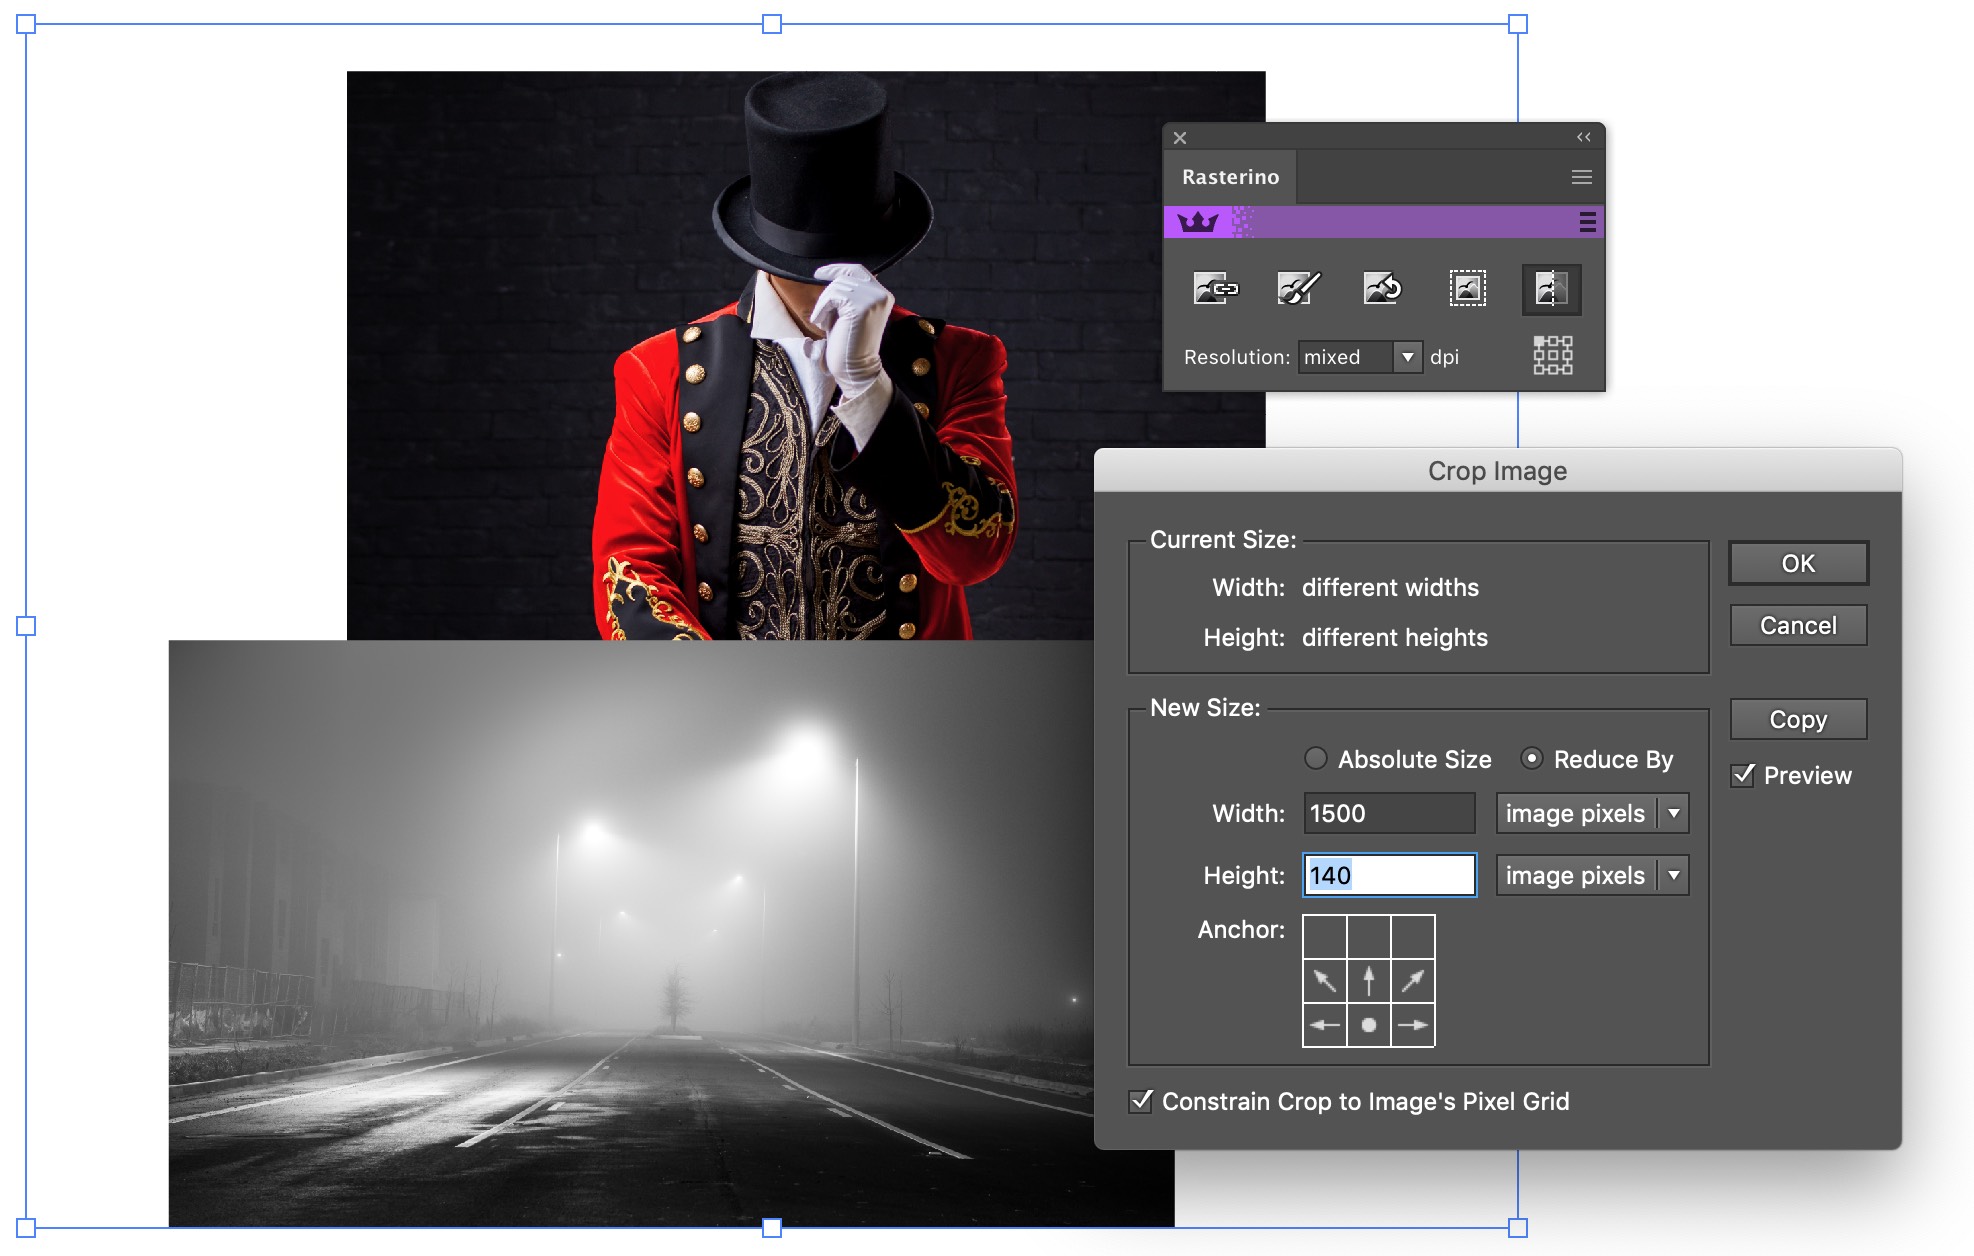
As with the Trim Image function, OK will fix the crop whilst Re-create will maintain the underlying prototype(s) and identify the resultant cropped image instances on elevation in position.
Pro tip - select the Rasterino Panel's flyout menu entry Crop Image Tool Options to tweak the way you lot desire to work.
Linked images vs. embedded images
Information technology's important to consider the differences between linked images and embedded images when looking at cropping.
Linked images
-
Image file is stored external to the Illustrator file and only referenced within the artboard.
-
It'due south just possible to employ a clipping mask crop to linked images as true cropping (removing pixels) will require edits to the external paradigm file in Photoshop or similar.
-
Using linked images can help reduce Adobe Illustrator file and ensure the same image (such as a logo) is used beyond multiple projects.
-
It's easy to break a reference link to the external epitome's location.
Embedded images
-
The image data is stored inside the Illustrator document.
-
It's possible to both clipping mask-crop or truthful crop and trim an embedded prototype.
-
It increases the Illustrator file size merely there's no take a chance of a broken reference link.
-
Both native Illustrator functionality and Rasterino provide methods to relink an embedded image if required.
-
Rasterino allows for in-line editing of an embedded image in Photoshop or your preferred photo editing software, including ones cropped using a clipping mask.
Clipping mask-cropped images vs. true cropping
There are two ways to ingather an image in Illustrator. Both have their pros and cons as detailed here.
Use of a clipping mask
-
It's possible to remove the clipping mask at any stage to reveal the original image providing greater flexibility and allows for experimentation.
-
You can use a clipping mask on both linked and embedded images. If y'all modify an externally linked image, the clipping mask-cropped outcome will automatically update.
-
You're non restricted by rectangular-only cropping.
-
If y'all only intend to export the final artwork as an epitome, the resultant file will not be differentiated from one which used a true image crop.
True cropping
-
Unwanted areas of an embedded image are permanently removed, therefore reducing the Illustrator or other exported vector file size.
-
Easier to manage artwork without extra cropping vectors "getting in the way".
-
Cropping takes place on a pixel-basis whereas vector cropping tin hands ingather regardless of the image'south pixel filigree.
Source: https://astutegraphics.com/learn/tutorial/how-to-crop-and-trim-a-photo-in-adobe-illustrator
0 Response to "How to Size Down Layers Outside of Art Area Illustrator Cc"
Post a Comment